OCP Upgrade Preparation
Firmware compatibility
Firmware is NOT part of the OpenShift upgrade and can not be controlled through OpenShift. However, in Telco we run most of our clusters on baremetal which means that we need to be very mindful of the firmware level on all of our hardware.
All hardware vendors will advise that it is always best to be on their latest certified version of firmware for their hardware. In the telco world this comes with a trust but verify approach due to the high throughput nature of telco CNFs. Therefore, it is important to have a regimented group who can test the current and latest firmware from any vendor to make sure that all components will work with both. It is not always recommended to upgrade firmware in conjunction with an OCP upgrade however if it is possible to test the latest release of firmware that will improve the odds that you won’t run into issues down the road.
Upgrading firmware is a very important debate because the process can be very intrusive and has a potential for causing a node to require manual interventions before the node will come back online. On the other hand it may be imperative to upgrade the firmware due to security fixes, new required functionality or compatibility with the new release of OCP components. Therefore, it is up to everyone to verify with their hardware vendors, verify compatibility with OCP components and perform tests in their lab before moving forward.
Layer product compatibility
It is important to make sure all layered products will run on the new version of OCP that you will be moving to. This, very much, includes all Operators.
Verify the current installed list of Operators installed on your cluster. For example:
# oc get csv -A
NAMESPACE                              NAME                                 DISPLAY          VERSION   REPLACES                             PHASE
chapter2                               gitlab-operator-kubernetes.v0.17.2   GitLab           0.17.2    gitlab-operator-kubernetes.v0.17.1   Succeeded
openshift-operator-lifecycle-manager   packageserver                        Package Server   0.19.0                                         Succeeded
OLM Operator compatibility
There is a set of Red Hat Operators that are NOT part of the cluster operators which are otherwise known as the OLM installed operators. To determine the compatibility of these OLM installed operators there is a great web based tool that can be used to determine which versions of OCP are compatible with specific releases of an Operator. This tool is meant to tell you if you need to upgrade an Operator after each Y-Stream upgrade or if you can wait until you have fully upgraded to the next EUS release. In Step 9 under the “Upgrade Process Flow” section you will find additional information regarding what you need to do if an Operator needs to be upgraded after performing the first Y-Stream Control Plane upgrade.
| Some Operators are compatible with several releases of OCP. So, you may not need to upgrade until you complete the cluster upgrade. This is shown in Step 13 of the Upgrade Process Flow. |
Prepare MCPs
Prepare your Machine Config Pool (MCP) labels by grouping your nodes, depending on the number of nodes in your cluster. MCPs should be split up into 8 to 10 nodes per group. However, there is no hard fast rule as to how many nodes need to be in each MCP. The purpose of these MCPs is to group nodes together so that the upgrade and reboot of a group of nodes can be controlled independently of the rest. Additional information and examples can be found here, under the EUS to EUS upgrade documentation. These MCPs will be used to un-pause a set of nodes during the upgrade process, thus allowing them to be upgraded and rebooted at a determined time instead of at the pleasure of the scheduler. Please review the upgrade process flow section, below, for more details on the pause/un-pause process.
What is the purpose of only upgrading some nodes?
During an upgrade there is always a chance that there will be a problem. Most often the problem is related to hardware failure or needing to be reset. If a problem were to occur, having a set of MCPs in a paused state allows the cluster administrator to make sure there are enough nodes running at all times to keep all applications running. The most important thing is to make sure there are enough resources for all application pods.
How should worker nodes be divided into MCPs?
This can vary depending on how many nodes are in the cluster or how many nodes are in a node role. By default the 2 roles in a cluster are master and worker. However, in Telco clusters we quite often split the worker nodes out into 2 separate roles of control plane and data plane. The most important thing is to add MCPs to split out the nodes in each of these two groups.
For example:
We have 15 worker nodes in a cluster
10 worker nodes are in the control plane role
5 worker nodes are in the data plane role
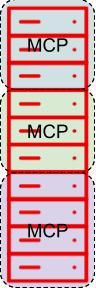
In this cluster you should split both the CNF control plane and data plane worker node roles into at least 2 MCPs.
The advantage is that having 2 MCPs will allow you to have one set of nodes that are not affected by the upgrade if you need a stopping point.
An example of a larger cluster might have as many as 100 worker nodes in the control plane role. In this case you would want to make sure that you keep each MCP to around 10 nodes. This will allow you to either unpause multiple MCPs at a time to speed up the upgrade or allow you to separate out the upgrade over at least 2 maintenance windows.
Here is a depiction of what this would look like:
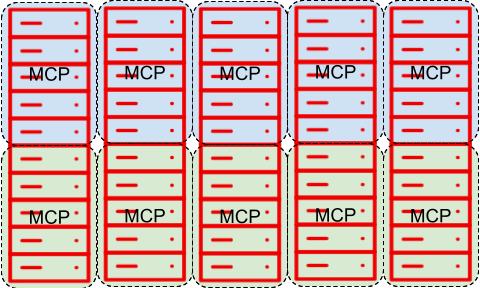
The division and size of these MCPs can vary depending on many factors. In general the standard division in large clusters is between 8 and 10 nodes per MCP to allow the operations team to control how many nodes are taken down at a time.
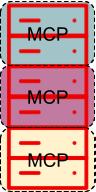
Here is another example but with a medium cluster.
There are a total of 6 nodes in this role. The MCPs inside of this role are split into 2 node MCPs.
The smaller MCPs allow 2 nodes to be upgraded which can then sit through a day to allow for verification of CNF compatibility before completing the upgrade on the other 4 nodes.
The process and pace at which you un-pause the MCPs is determined by your CNFs and their configuration. Please review the sections on PDB and anti-affinity for CNFs. If your CNF can properly handle scheduling within an OpenShift cluster you can un-pause several MCPs at a time and set the MaxUnavailable to as high as 50%. This will allow as many as half of the nodes in an MCPs to restart and upgrade. This will reduce the amount of time that is needed for a specific maintenance window and allow your cluster to upgrade quickly.
Review your cluster for available MCPs and nodes
First you can run “oc get mcp” to show your current list of MCPs:
# oc get mcp
NAME     CONFIG  UPDATED   UPDATING   DEGRADED   MACHINECOUNT   READYMACHINECOUNT   UPDATEDMACHINECOUNT   DEGRADEDMACHINECOUNT   AGE
master   rendered-master-b…e83   True      False      False      3              3                   3
0                      25d
worker   rendered-worker-2….c4f   True      False      False      2              2                   2
 0                      25d
Now list out all of the nodes in your cluster:
| Review what is listed in the “ROLES” column, this will get updated as we move through this process. |
# oc get no
NAME                                           STATUS   ROLES    AGE   VERSION
ctrl-plane-0   Ready    control-plane,master   39d   v1.25.10+28ed2d7
ctrl-plane-1   Ready    control-plane,master   39d   v1.25.10+28ed2d7
ctrl-plane-2   Ready    control-plane,master   39d   v1.25.10+28ed2d7
worker-0       Ready    worker           39d   v1.25.10+28ed2d7
worker-1       Ready    worker           39d   v1.25.10+28ed2d7
Determine, from the above suggestions, how you would like to separate out your worker nodes into machine config pools (MCP).
Create your MCPs
This is a 2 step process:
-
We add a MCP label to each node
-
We apply an MCP to the cluster which will organize the nodes based on their labels
| In the following example there are only 2 nodes and 2 MCPs. Therefore, each MCP only has 1 node in each. |
Labeling nodes
We first need to label the nodes so that they can be put into MCPs. We will do this with the following commands:
oc label node worker-0 node-role.kubernetes.io/mcp-1=
oc label node worker-1 node-role.kubernetes.io/mcp-2=| The labels will show up when you run the “oc get node” command: |
# oc get no
NAME                                STATUS   ROLES          AGE   VERSION
ctrl-plane-0   Ready    control-plane,master   39d   v1.25.10+28ed2d7
ctrl-plane-1   Ready    control-plane,master   39d   v1.25.10+28ed2d7
ctrl-plane-2   Ready    control-plane,master   39d   v1.25.10+28ed2d7
worker-0       Ready    mcp-1,worker           39d   v1.25.10+28ed2d7
worker-1       Ready    mcp-2,worker           39d   v1.25.10+28ed2d7
Applying MCPs according to label
Now you need to create yaml files that will apply the labels as MCPs in your cluster. Each MCP will have to have a separate file or a separate section (as it is shown below).
Here is one example:
---
apiVersion: machineconfiguration.openshift.io/v1
kind: MachineConfigPool
metadata:
  name: mcp-2
spec:
  machineConfigSelector:
    matchExpressions:
      - {
         key: machineconfiguration.openshift.io/role,
         operator: In,
         values: [worker,mcp-2]
        }
  nodeSelector:
    matchLabels:
      node-role.kubernetes.io/mcp-2: ""
---
apiVersion: machineconfiguration.openshift.io/v1
kind: MachineConfigPool
metadata:
  name: mcp-1
spec:
  machineConfigSelector:
    matchExpressions:
      - {
         key: machineconfiguration.openshift.io/role,
         operator: In,
         values: [worker,mcp-1]
        }
  nodeSelector:
    matchLabels:
      node-role.kubernetes.io/mcp-1: ""
Apply or create the MCPs through:
# oc apply -f mcps.yaml
machineconfigpool.machineconfiguration.openshift.io/mcp-2 created
Monitor MCP formation
Now you can run “oc get mcp” again and your new MCPs will show. It will take a few minutes for your nodes to move into the new MCPs that they are assigned to. However, the nodes will NOT reboot during this time.
| You will still see the original worker and master MCPs that are part of the cluster. |
This is what it will look like right after you apply the MCPs:
# oc get mcp
NAME     CONFIG      UPDATED   UPDATING   DEGRADED   MACHINECOUNT   READYMACHINECOUNT   UPDATEDMACHINECOUNT   DEGRADEDMACHINECOUNT   AGE
master   rendered-master-b…e83   True      False      False      3              3                 3                     0                      25d
mcp-1    rendered-mcp-1-2…c4f    False     True       True       1              0                 0                     0                      10s
mcp-2    rendered-mcp-2-2…c4f    False     True       True       1              0                 0                     0                      10s
worker   rendered-worker-2…c4f   False     True       True       0              0                 0                     2                      25d
This is what it will look like after the MCPs have been completely applied:
# oc get mcp
NAME     CONFIG     UPDATED   UPDATING   DEGRADED   MACHINECOUNT   READYMACHINECOUNT   UPDATEDMACHINECOUNT   DEGRADEDMACHINECOUNT   AGE
master   rendered-master-b…e83   True      False      False      3              3                 3                     0                      25d
mcp-1    rendered-mcp-1-2…c4f    True      False      False      1              1                 1                     0                      7m33s
mcp-2    rendered-mcp-2-2…c4f    True      False      False      1              1                 1                     0                      51s
worker   rendered-worker-2…c4f   True      False      False      0              0                 0                     0                      25d
Environment considerations
In Telecommunications environments most of the clusters are kept in an “air gapped” or disconnected network. Therefore, you will need to update your offline image repository. When choosing which images to include, please review the OCP API Compatibility Policy section to make sure the cluster will be able to upgrade to the new version of OCP. Setting up and managing an offline image repository is currently out of scope at this time but will be added at a later date.
Platform preparation
This section should be used as a basic set of checks and verifications to make sure that your cluster is ready for an upgrade.
Basic cluster checks
First you will need to verify that there are no issues with failed pods within the cluster that will stop the upgrade. A very easy first check is to run:
[cnf@utility ~]$ oc get po -A | egrep -vi 'complete|running'
NAMESPACE         NAME       READY   STATUS      RESTARTS        AGE
[cnf@utility ~]$| You may need to run this twice if there are pods that are in pending state as they may just have moved around due to normal operating conditions of the cluster. |
If there are problems with pods, please review the troubleshooting documentation to determine what the issue is with the pod(s).
Next verify that all nodes within the cluster are available:
jcl@utility ~]$ oc get no
NAME           STATUS   ROLES                  AGE   VERSION
ctrl-plane-0   Ready    control-plane,master   32d   v1.25.14+a52e8df
ctrl-plane-1   Ready    control-plane,master   32d   v1.25.14+a52e8df
ctrl-plane-2   Ready    control-plane,master   32d   v1.25.14+a52e8df
worker-0       Ready    mcp-1,worker           32d   v1.25.14+a52e8df
worker-1       Ready    mcp-2,worker           32d   v1.25.14+a52e8df
Verify that all baremetal nodes are fully provisioned and ready in the cluster. Here is an example of a cluster that has a baremetal node that had an error while provisioning:
cnf@utility ~]$ oc get bmh -n openshift-machine-api
NAME           STATE       CONSUMER                   ONLINE   ERROR   AGE
ctrl-plane-0   unmanaged   cnf-58879-master-0         true             33d
ctrl-plane-1   unmanaged   cnf-58879-master-1         true             33d
ctrl-plane-2   unmanaged   cnf-58879-master-2         true             33d
worker-0       unmanaged   cnf-58879-worker-0-45879   true             33d
worker-1       unmanaged   cnf-58879-worker-0-dszsh   true             33d
Now verify that all cluster operators are ready:
[cnf@utility ~]$ oc get co
NAME                                       VERSION   AVAILABLE   PROGRESSING   DEGRADED   SINCE   MESSAGE
authentication                             4.12.45   True        False         False      17h
baremetal                                  4.12.45   True        False         False      32d
...
service-ca                                 4.12.45   True        False         False      32d
storage                                    4.12.45   True        False         False      32d